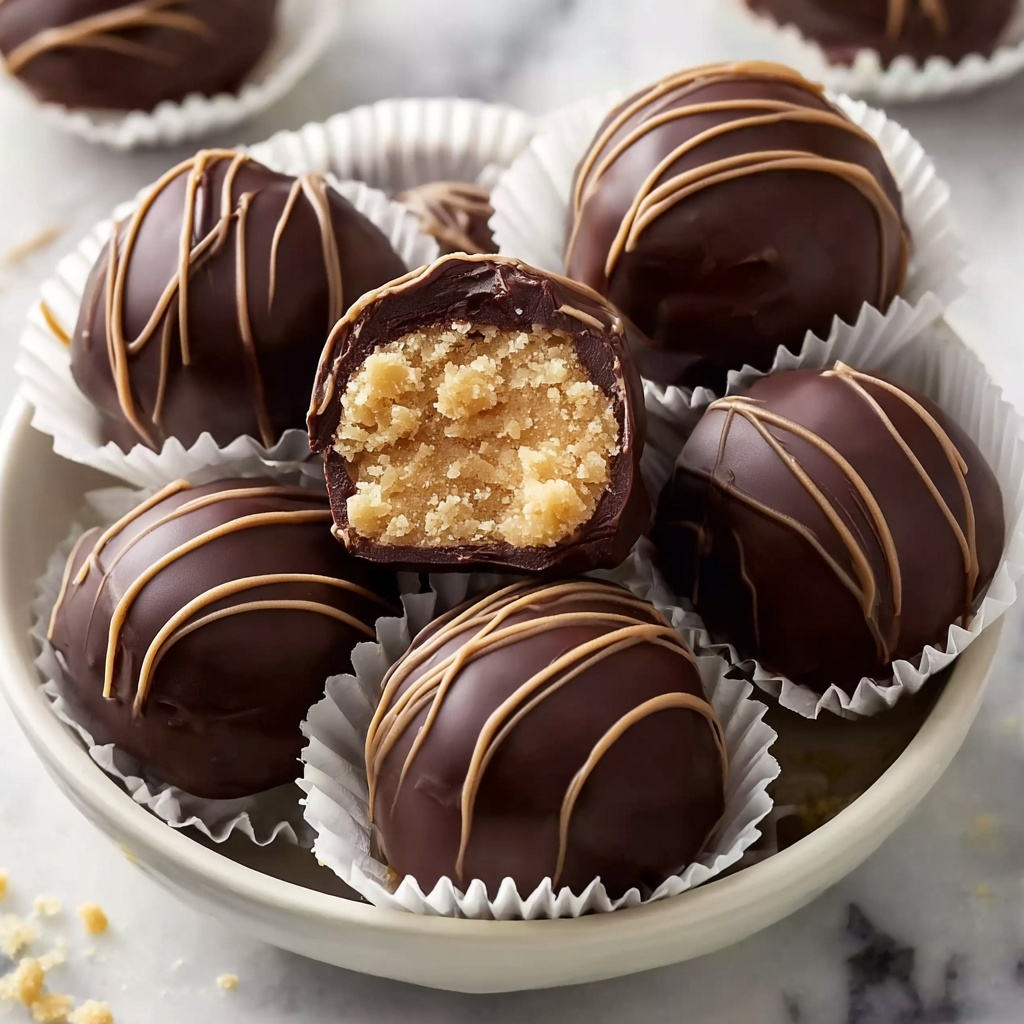
If you are looking for a delightful treat that’s quick to whip up and utterly delicious, look no further than this Irresistible Peanut Butter Balls Recipe. These bite-sized goodies pack a punch of creamy peanut butter wrapped in a luscious chocolate coating, creating a perfect harmony of flavors and textures. Whether you’re making a special snack for a party, holiday, or just a personal indulgence, these peanut butter balls will have everyone coming back for more. Their simplicity and rich taste truly make this recipe a keeper in any dessert lover’s collection.
Ingredients You’ll Need
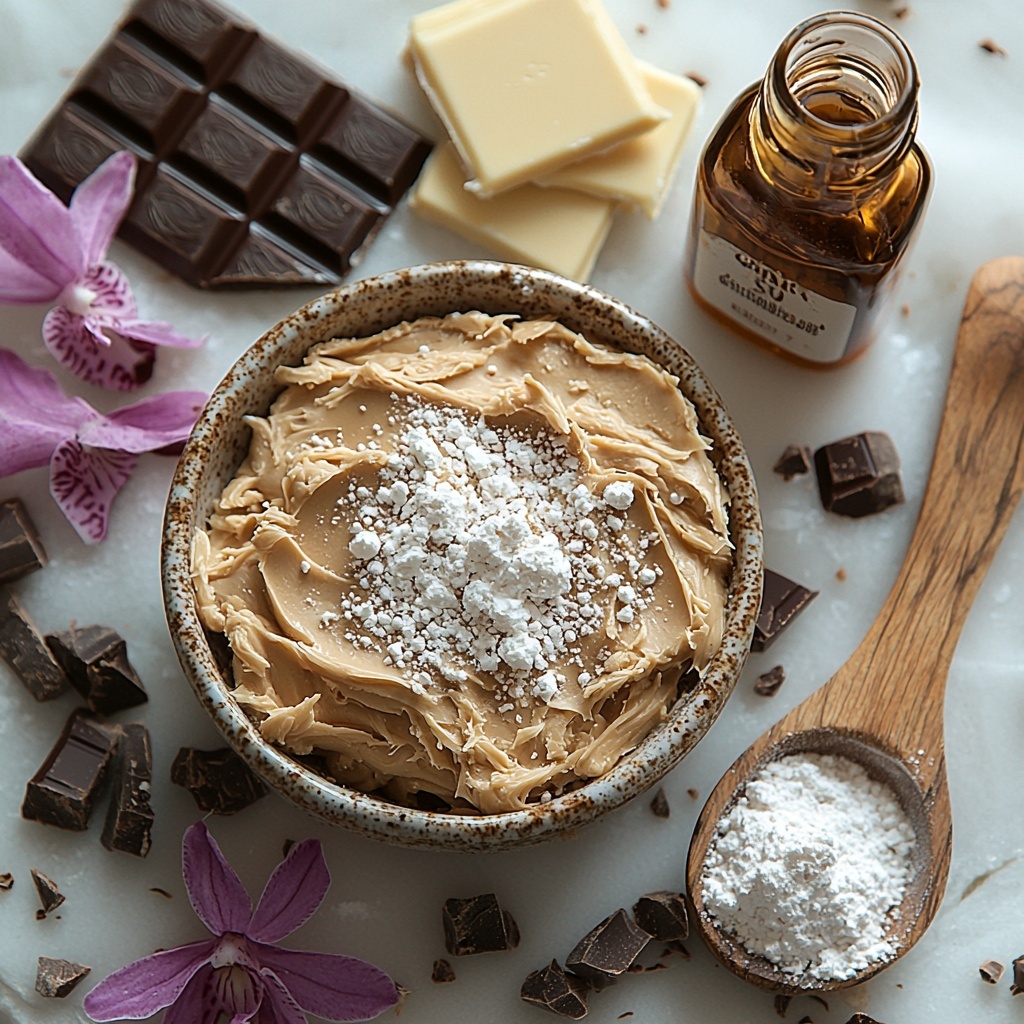
Gathering your ingredients for these peanut butter balls is refreshingly straightforward, yet each one plays a crucial role in bringing the perfect balance of taste, texture, and color. From the silky peanut butter base to the creamy chocolate shell, every component elevates this recipe to a mouthwatering experience.
- Creamy peanut butter (1 cup / 283g): The star ingredient delivers its classic nutty flavor and creamy texture that forms the base of the balls.
- Salted butter (6 tablespoons / 84g): Adds richness and depth; unsalted butter may be used with a pinch of salt for balance.
- Powdered sugar (2 3/4 cups / 311g): Sweetens the mixture and helps achieve the perfect consistency for rolling.
- Vanilla extract (1 teaspoon): Introduces a subtle warmth and enhances the peanut butter flavor.
- Chocolate melting wafers (10 ounces): Create a smooth, glossy coating that seals in the creamy filling.
How to Make Irresistible Peanut Butter Balls Recipe
Step 1: Cream the Peanut Butter and Butter
Start by gently softening the peanut butter and butter together using a hand mixer. Mixing until smooth ensures a creamy foundation that will blend seamlessly with the powdered sugar later. This step is key for that melt-in-your-mouth texture everyone will love.
Step 2: Add Powdered Sugar and Vanilla
Next, you’ll gradually fold in the powdered sugar to the peanut butter mixture. This is when the magic happens: the mixture thickens and turns into a pliable dough. Stir in vanilla extract to add complexity to the sweet nutty flavor, making your peanut butter balls irresistible indeed.
Step 3: Prepare Your Cookie Sheet
Line a large cookie sheet with wax or parchment paper. This simple tip saves you from sticky situations later, allowing the balls to chill and set without sticking to the tray. Convenience and non-stick benefits all in one.
Step 4: Shape the Peanut Butter Mixture into Balls
Using your hands, scoop out small 1-inch portions and roll them gently into smooth balls. Keep repeating until all the mixture is used—it’s a fun and satisfying step because you can see the treat taking shape right before your eyes.
Step 5: Chill the Peanut Butter Balls
Pop your newly formed balls into the refrigerator for about 20 minutes. This chilling process firms them up, making them much easier to dip into the chocolate later and ensuring they hold their shape beautifully.
Step 6: Melt the Chocolate for Coating
While the peanut butter balls chill, melt your chocolate wafers using short bursts in the microwave, stirring between intervals to avoid burning. A smooth, glossy melt means your peanut butter balls will look as good as they taste.
Step 7: Dip the Balls in Chocolate
Using a toothpick, dip each chilled peanut butter ball into the melted chocolate, fully coating it for that perfect glossy shell. Place each one back on the lined cookie sheet ready for the final step.
Step 8: Let the Chocolate Set
Allow your chocolate-coated peanut butter balls to set completely, either at room temperature or in the refrigerator. This ensures a firm, satisfying bite every time. Once set, they’re ready to serve or store for your enjoyment.
How to Serve Irresistible Peanut Butter Balls Recipe
Garnishes
Add an extra touch by sprinkling crushed peanuts, festive colored sprinkles, or a light dusting of sea salt over the chocolate before it sets. These garnishes add texture and visual appeal, making your peanut butter balls pop at any gathering.
Side Dishes
These peanut butter balls shine on their own as a snack but can also complement a cup of hot coffee, rich hot chocolate, or vanilla ice cream. The creamy and sweet combo pairs wonderfully with warm or cold beverages and other desserts.
Creative Ways to Present
For a charming presentation, arrange the peanut butter balls in decorative boxes or on tiered platters lined with colorful paper doilies. Wrapping each ball individually with a festive ribbon or placing them in decorative mini cupcake liners can also create a fun, gift-worthy treat.
Make Ahead and Storage
Storing Leftovers
Keep your peanut butter balls fresh by storing them in an airtight container in the refrigerator. They stay delicious and firm for up to 5 days, making them perfect for make-ahead treats you can enjoy throughout the week or share with friends.
Freezing
For longer storage, freeze the peanut butter balls in a single layer on a baking sheet first. Once frozen, transfer them to a freezer-safe container or bag. They can last for up to 2 months and thaw quickly in the fridge before serving.
Reheating
These treats are best enjoyed chilled or at room temperature, so reheating is generally not necessary. If the chocolate coating firmed up too much, simply let them sit at room temperature for a few minutes to soften slightly before digging in.
FAQs
Can I use crunchy peanut butter instead of creamy?
Absolutely! Crunchy peanut butter will add an extra delightful texture with bits of peanuts inside, making your peanut butter balls even more interesting to bite into.
What if I don’t have chocolate melting wafers?
You can use any good-quality chocolate chips or bars, but melting wafers are designed to melt smoothly and set nicely, so they make the coating process easier and neater.
Can these peanut butter balls be made vegan?
Yes, by using a plant-based butter alternative and dairy-free chocolate, you can create delicious vegan peanut butter balls that everyone can enjoy.
How do I prevent the chocolate from cracking after it sets?
Allow the chocolate to set slowly at room temperature or in the fridge without extreme temperature changes. Melting and cooling it gently helps maintain a smooth, crack-free finish.
Can I add mix-ins like nuts or chocolate chips inside?
Definitely! Adding mini chocolate chips, chopped nuts, or even dried fruit into the peanut butter mixture can create fun variations with extra texture and flavor.
Final Thoughts
There’s truly something magical about this Irresistible Peanut Butter Balls Recipe that makes every bite a little celebration of creamy, chocolatey goodness. Whether you’re treating yourself or sharing with loved ones, these easy-to-make delights bring joy and satisfaction in every nibble. Don’t hesitate—grab your ingredients and enjoy making these delightful sweets that are sure to become a beloved classic in your kitchen!
Print
Irresistible Peanut Butter Balls Recipe
- Prep Time: 15 minutes
- Cook Time: 20 minutes (chilling and chocolate melting time included)
- Total Time: 35 minutes
- Yield: 36 peanut butter balls
- Category: Dessert
- Method: No-Cook
- Cuisine: American
- Diet: Vegetarian
Description
These irresistible peanut butter balls are a delightful no-bake treat featuring a creamy peanut butter and powdered sugar center coated in rich melted chocolate. Perfect for parties, holidays, or anytime you crave a sweet, nutty indulgence, they are easy to make and ready in under an hour.
Ingredients
Main Ingredients
- 1 cup (283g) creamy peanut butter
- 6 tablespoons (84g) salted butter (or unsalted butter + 1/4 teaspoon salt)
- 2 3/4 cups (311g) powdered sugar
- 1 teaspoon vanilla extract
For the Coating
- 1 package (10 ounces) chocolate melting chocolate (such as Ghirardelli or Candiquik)
Instructions
- Cream Peanut Butter and Butter: In a mixing bowl, use a hand mixer to cream together the peanut butter and butter until smooth and well blended. This creates a creamy base for the balls.
- Add Powdered Sugar and Vanilla: Gradually add the powdered sugar to the creamed mixture, mixing until well combined. Stir in the vanilla extract to enhance the flavor and achieve a smooth, cohesive dough.
- Prepare the Cookie Sheet: Line a large cookie sheet with wax paper or parchment paper to prevent the peanut butter balls from sticking after shaping.
- Shape the Peanut Butter Balls: Scoop out 1-inch portions of the peanut butter mixture and roll each into a ball using your hands. Place each ball onto the prepared cookie sheet, covering the entire batch.
- Chill the Balls: Refrigerate the peanut butter balls for about 20 minutes until firm. This step makes them easier to handle during the chocolate coating.
- Melt the Chocolate: Place the chocolate melting wafers in a microwave-safe bowl. Microwave for 30 seconds, stir, then continue microwaving in 10-second intervals, stirring between each, until the chocolate is fully melted and smooth. Alternatively, follow package directions for melting.
- Coat the Balls in Chocolate: Remove the chilled peanut butter balls from the fridge. Using a toothpick, dip each ball into the melted chocolate, fully coating it. Place the coated balls back on the lined cookie sheet.
- Set the Chocolate: Allow the chocolate-coated balls to harden completely at room temperature or in the refrigerator. Once set, they are ready to serve or can be stored.
Notes
- Use creamy peanut butter for the best texture; natural peanut butter might be too oily.
- Ensure the balls are firm before dipping to avoid breaking apart in the chocolate.
- If you don’t have chocolate melting wafers, you can use high-quality chocolate chips with a teaspoon of shortening or coconut oil to help melting smoothly.
- Store finished peanut butter balls in an airtight container in the refrigerator for up to 5 days to maintain freshness.
- For a variation, try adding a pinch of salt to the peanut butter mixture for a salty-sweet flavor.

