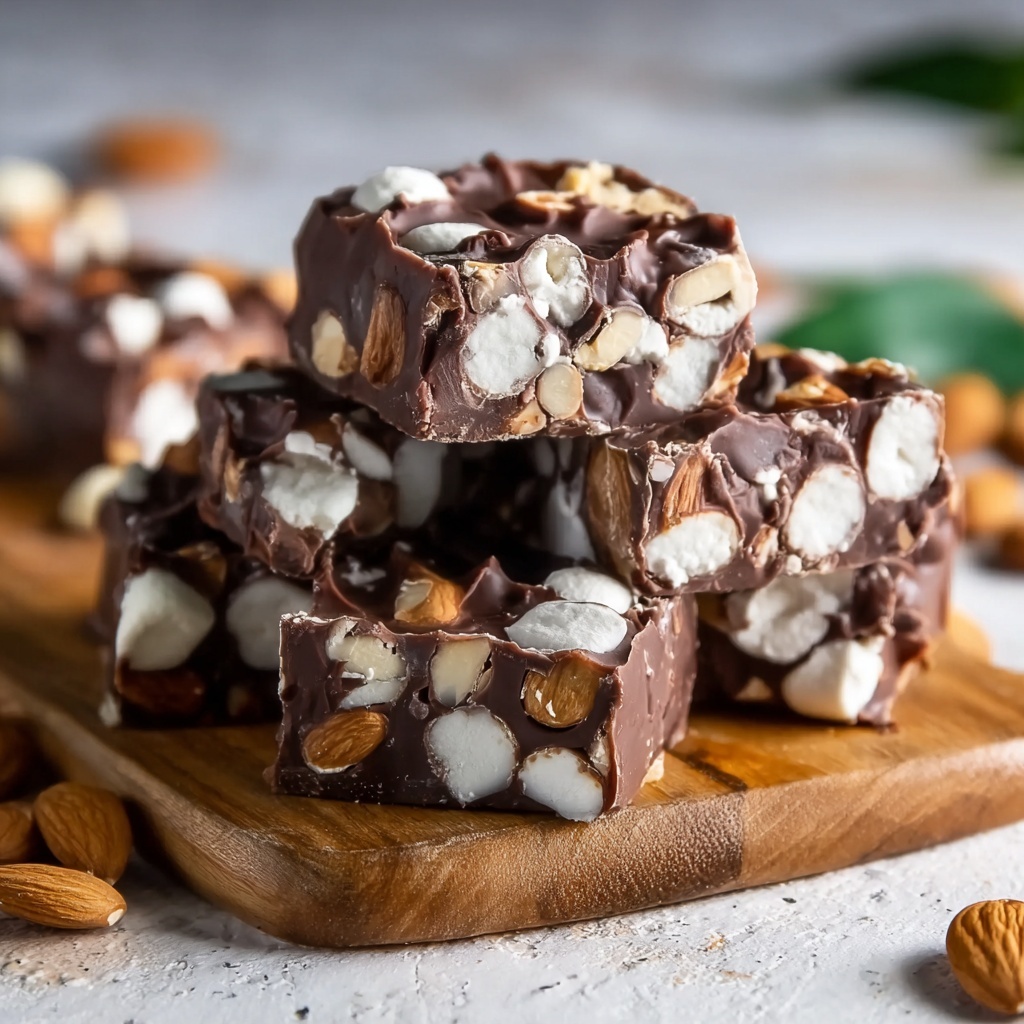
If you’re craving a treat that combines rich chocolate, crunchy nuts, and fluffy marshmallows, you’re going to love this Easy Rocky Road Candy Recipe. It’s a wonderfully nostalgic candy that’s as fun to make as it is to eat. Perfect for sharing with friends or keeping all to yourself, this recipe takes just minutes and uses simple ingredients that come together to create a truly irresistible flavor and texture harmony. Whether it’s for a festive occasion or a cozy night in, this Easy Rocky Road Candy Recipe will quickly become your go-to sweet fix.
Ingredients You’ll Need
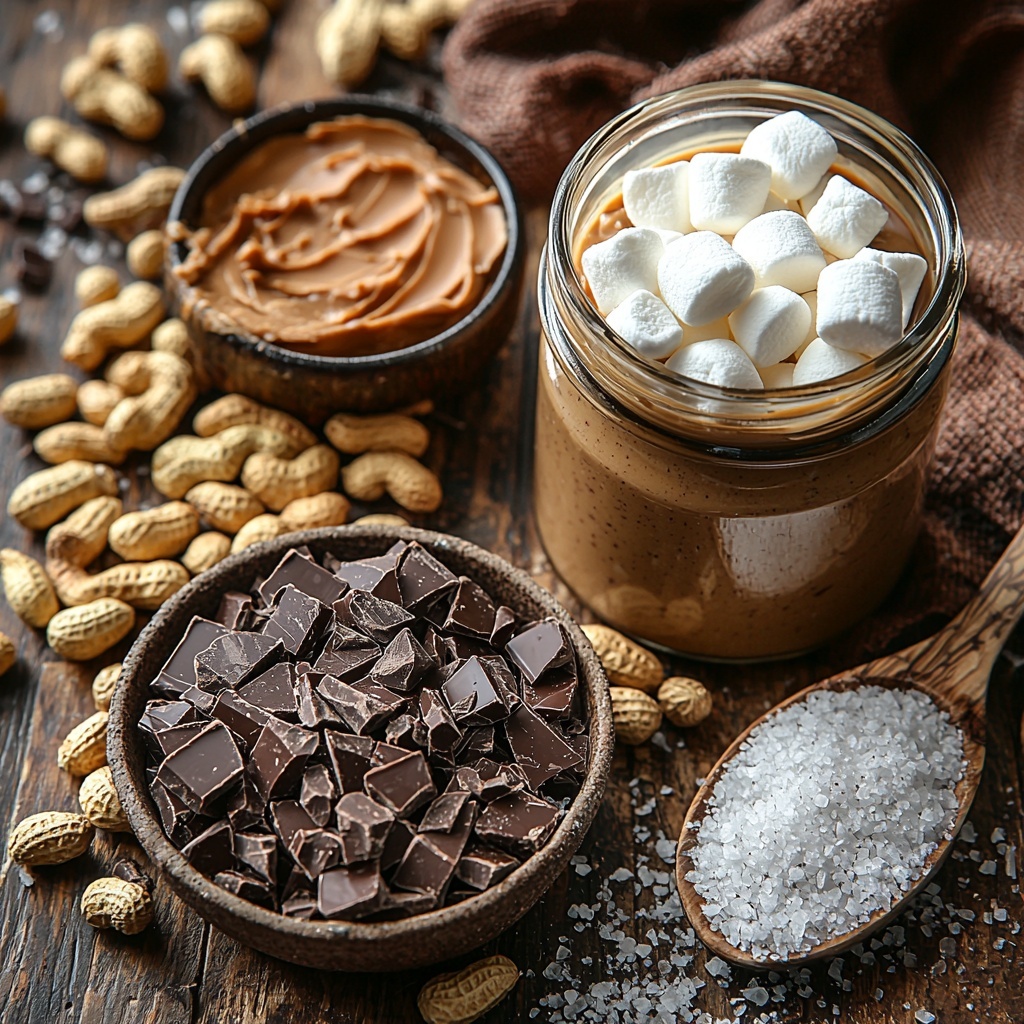
Gathering these straightforward yet flavorful ingredients is the first step toward making your Easy Rocky Road Candy Recipe a success. Each element plays a vital role—chocolate for the luscious base, peanuts for that satisfying crunch, marshmallows for light, gooey sweetness, and a touch of salt to elevate every bite.
- Milk chocolate chips (2 ½ cups): Use milk, semi-sweet, or dark chocolate chips based on your preference for sweetness and richness.
- Creamy peanut butter (¾ cup, optional): Adds a smooth, nutty depth but feel free to omit if you have allergies or want a pure chocolate taste.
- Lightly salted peanuts (2 ½ cups): Salted nuts provide the perfect crunchy contrast—swap with walnuts, almonds, pecans, or macadamia nuts to customize.
- Mini marshmallows (2 ½ cups): These little clouds of sweetness soften the candy while adding an irresistible chewiness.
- Coarse salt (1 teaspoon): Just a sprinkle enhances the complex flavors, making every bite balanced and decadent.
How to Make Easy Rocky Road Candy Recipe
Step 1: Melt the Chocolate and Peanut Butter
Begin by gently melting the chocolate chips and creamy peanut butter together in a microwave-safe bowl or over a double boiler. Stir frequently to ensure the mixture is smooth and velvety. This luscious blend forms the delicious base of your candy and is where the magic starts.
Step 2: Mix in the Nuts and Marshmallows
Once your chocolate and peanut butter are perfectly combined, fold in the lightly salted peanuts and mini marshmallows. The nuts offer a delightful crunch, while the marshmallows provide a soft, pillowy texture that contrasts beautifully with the rich chocolate.
Step 3: Spread the Mixture in a Pan
Pour the Rocky Road mixture into a lined baking pan, spreading it evenly so every piece has a perfect balance of ingredients. This ensures you get the classic look and bite that makes this candy so beloved.
Step 4: Sprinkle with Coarse Salt
Sprinkle the surface with a teaspoon of coarse salt. This simple touch brings out the chocolate’s flavors and adds a subtle, savory edge that will wow your taste buds.
Step 5: Chill and Set
Place the pan in the refrigerator and let the candy chill for at least two hours or until it’s firm and easy to cut. This step is key for that satisfying snap and just-right texture you’re aiming for.
How to Serve Easy Rocky Road Candy Recipe
Garnishes
After cutting your Rocky Road candy into bite-sized squares, you can dress them up with a few extra touches. A light dusting of cocoa powder or a drizzle of melted white chocolate can elevate the presentation, while a sprinkle of crushed nuts on top adds visual appeal and extra crunch.
Side Dishes
While this candy shines on its own, consider serving it alongside a scoop of vanilla ice cream or a hot cup of coffee for a delightful contrast. The richness of the Rocky Road pairs exceptionally well with light, creamy, or caffeinated companions.
Creative Ways to Present
For parties or gift-giving, wrap your Rocky Road candy squares in colorful parchment paper tied with twine, or place them in decorative boxes or jars. Presenting them in festive cellophane bags with a personalized tag also makes a charming treat to share with friends and family.
Make Ahead and Storage
Storing Leftovers
After enjoying your Rocky Road candy, store any leftovers in an airtight container at room temperature or in the fridge if your environment is warm. Properly stored, the candy stays fresh and delicious for up to two weeks, maintaining its texture and flavor.
Freezing
If you want to keep your treats longer, freezing is a great option. Wrap the candy tightly in plastic wrap and place it in a freezer-safe container or bag. When stored this way, your Rocky Road candy can last for up to three months without losing its magic.
Reheating
There’s no need to reheat Rocky Road candy, as it’s best enjoyed chilled or at room temperature. If it softens too much on a warm day, simply pop it in the fridge for a bit to firm back up before serving.
FAQs
Can I use different types of chocolate for Easy Rocky Road Candy Recipe?
Absolutely! While milk chocolate is classic, you can experiment with semi-sweet or dark chocolate chips for a richer or more intense flavor. White chocolate can work too if you want a unique twist.
Is the peanut butter necessary in this recipe?
Peanut butter is optional but adds creaminess and a deeper nutty flavor to the candy. If you prefer or have allergies, simply omit it and the recipe will still be delicious with the nuts and chocolate carrying the flavors.
How long does Easy Rocky Road Candy keep?
Stored properly in an airtight container at room temperature or in the fridge, your Rocky Road candy will stay fresh for about two weeks. For longer storage, freezing is a wonderful solution.
Can I use other nuts instead of peanuts?
Definitely! This recipe is very flexible. Walnuts, almonds, pecans, or macadamia nuts all bring their own unique flavor and texture, making the candy your own creation.
How do I make my Rocky Road candy less sticky?
Be sure to chill the candy thoroughly before cutting and handling to minimize stickiness. You can also lightly grease your knife or wipe it with a damp cloth between cuts for cleaner pieces.
Final Thoughts
This Easy Rocky Road Candy Recipe is one of those treasures that feels like a warm hug. It’s quick, simple, and packed with flavors and textures that bring smiles all around. Whether you’re making it for a special occasion or just because, I encourage you to give this recipe a try—you might just find your new favorite sweet treat to share and savor!
Print
Easy Rocky Road Candy Recipe
- Prep Time: 10 minutes
- Cook Time: 0 minutes
- Total Time: 2 hours 10 minutes (including chilling time)
- Yield: 30 servings
- Category: Candy
- Method: No-Cook
- Cuisine: American
Description
This Rocky Road Candy Recipe is a delightful no-bake treat combining rich milk chocolate, creamy peanut butter, crunchy salted peanuts, and soft mini marshmallows. Perfect for satisfying a sweet tooth, this easy recipe yields a generous batch of bite-sized candy loaded with classic Rocky Road flavors.
Ingredients
Chocolate Mixture
- 2 ½ cups milk chocolate chips (or semi-sweet/dark chocolate chips)
- ¾ cup creamy peanut butter (optional)
Add-ins
- 2 ½ cups lightly salted peanuts (or nuts of choice: walnuts, almonds, pecans, macadamia nuts)
- 2 ½ cups mini marshmallows
- 1 teaspoon coarse salt
Instructions
- Melt Chocolate and Peanut Butter: In a microwave-safe bowl, combine the milk chocolate chips and creamy peanut butter if using. Microwave in 30-second intervals, stirring well between each, until completely melted and smooth.
- Mix in Nuts and Marshmallows: Add the lightly salted peanuts and mini marshmallows to the melted chocolate mixture. Stir gently but thoroughly to evenly distribute the peanuts and marshmallows throughout the chocolate.
- Transfer and Set: Line a square baking dish with parchment paper. Pour the chocolate mixture into the dish and spread it out evenly with a spatula. Sprinkle the coarse salt evenly over the top for a slight salty contrast.
- Chill and Harden: Refrigerate the mixture for at least 2 hours or until it is completely set and firm. This will allow the candy to hold its shape when cut.
- Cut and Serve: Remove the set candy from the dish by lifting the parchment paper. Cut the Rocky Road into bite-sized squares using a sharp knife. Serve immediately or store in an airtight container in the fridge.
Notes
- You can substitute the milk chocolate chips with semi-sweet or dark chocolate chips for a different flavor profile.
- Use nuts of your choice such as walnuts, almonds, pecans, or macadamia nuts to customize the texture and taste.
- The peanut butter is optional but adds extra creaminess and flavor.
- Ensure the candy is completely set before cutting to avoid sticking or crumbling.
- Store leftovers in an airtight container in the refrigerator for up to 2 weeks.


