
If you have a sweet tooth and love a bit of crunch with your chocolate, this Butterfinger Balls Recipe is your new best friend. These little delights combine creamy peanut butter, the irresistible crunch of Butterfinger bars, and a luscious chocolate coating that will make every bite a celebration. Whether you’re serving them at a party, gifting them to friends, or simply indulging yourself, these Butterfinger Balls are a playful yet elegant treat that’s as simple to make as they are delicious.
Ingredients You’ll Need
These ingredients are straightforward but essential. Each one plays a vital role in achieving that perfect balance of creamy, crunchy, sweet, and chocolaty that makes the Butterfinger Balls Recipe truly unforgettable.
- Softened butter: Adds richness and helps bind the mixture for a smooth, melt-in-your-mouth texture.
- Creamy peanut butter: Brings a nutty depth and creamy consistency that complements the candy’s crunch.
- Powdered sugar: Sweetens the mix while ensuring a silky-smooth finish without any grittiness.
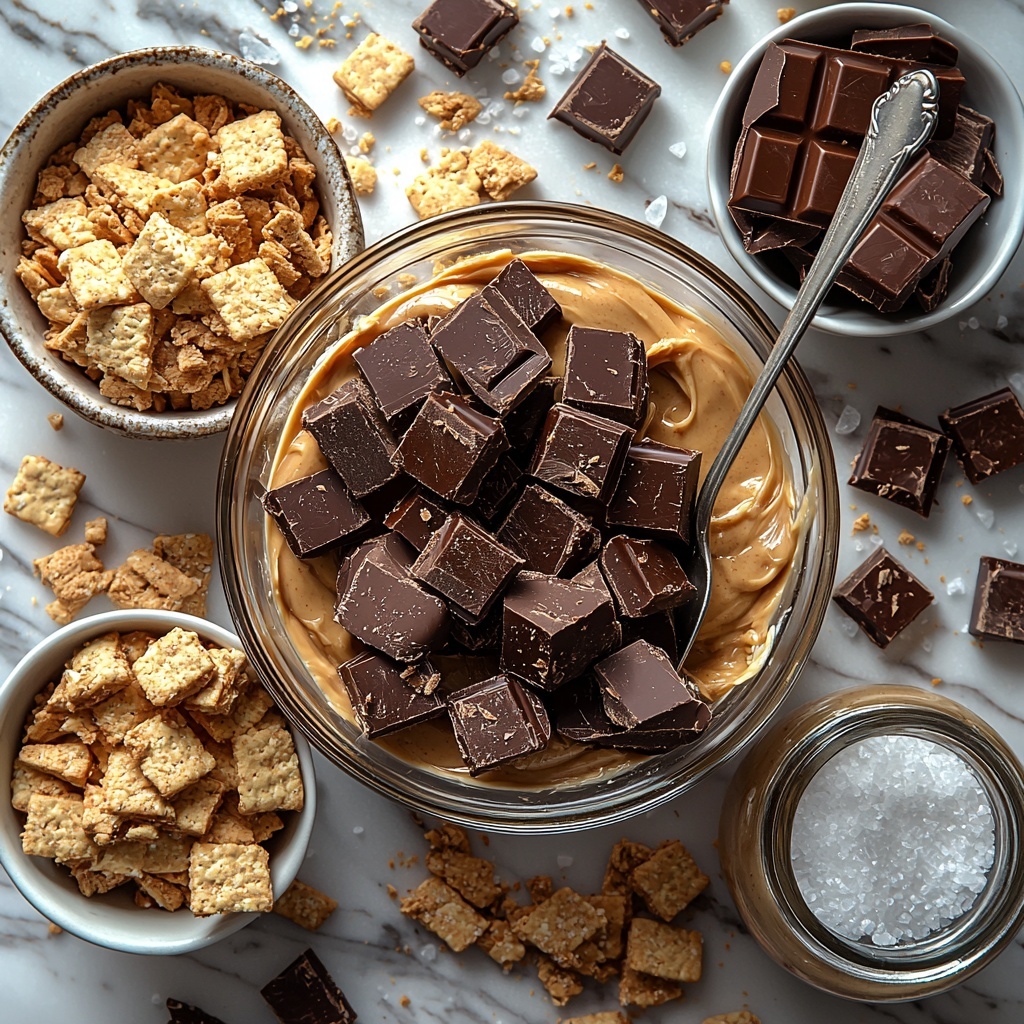
- Crushed graham crackers: Offers a lightly sweet, crumbly base that adds texture and a hint of honeyed flavor.
- Crushed Butterfinger bars: The star ingredient, providing that signature candy crunch and butterscotch taste everyone loves.
- Chocolate bark or chips: Creates a glossy, decadent coating that seals in all the yumminess inside.
- Optional garnishes (crushed Butterfinger bars, sprinkles, sea salt): Add a personal touch and extra flavor contrast for a show-stopping finish.
How to Make Butterfinger Balls Recipe
Step 1: Blend the Butter and Peanut Butter
Start by combining the softened butter and creamy peanut butter in a mixing bowl. Blend these together until perfectly smooth. This combo lays the creamy and rich foundation for your Butterfinger Balls, ensuring every bite melts beautifully on your tongue.
Step 2: Add Sweetness with Vanilla and Powdered Sugar
Next, stir in vanilla extract to infuse a subtle flavor boost, then gradually add the powdered sugar while continuously blending. This step sweetens the mixture while maintaining a silky texture, making it easy to shape later on.
Step 3: Fold in Crunchy Ingredients
Gently fold in the crushed graham crackers and crushed Butterfinger bars. This is where your Butterfinger Balls Recipe really comes to life, with the buttery crunch of the candy balancing the smoothness of the peanut butter mixture perfectly.
Step 4: Shape into Perfectly Sized Balls
Using your hands or a small scoop, roll the mixture into balls about 1 to 1½ tablespoons in size. Place them neatly on a parchment-lined cookie sheet for easy handling and chilling. This size means each Butterfinger Ball is bite-sized and just right for snacking or sharing.
Step 5: Chill Until Firm
Pop the cookie sheet into the freezer for approximately 30 minutes. Chilling ensures the balls hold together well and get that firm center that contrasts beautifully with the chocolate shell.
Step 6: Melt the Chocolate
While the balls firm up, melt your chocolate bark or chips in a microwave-safe bowl. Heat in 30-second intervals, stirring each time for a smooth and glossy finish essential for coating.
Step 7: Coat the Balls with Chocolate
Once chilled, dip each Butterfinger Ball into the melted chocolate, making sure every bit is covered in that luscious layer. Place the balls back on the parchment paper, ready for their final touch.
Step 8: Add Finishing Garnishes and Set
Before the chocolate hardens, sprinkle on any optional garnishes like extra crushed Butterfinger bits, festive sprinkles, or a pinch of sea salt for a flavor punch. Let the chocolate set completely at room temperature or in the fridge for a quick finish.
How to Serve Butterfinger Balls Recipe
Garnishes
Adding garnishes not only makes your Butterfinger Balls look irresistible but also enhances their flavor. Crushed Butterfinger bits keep the candy theme going, sprinkles add color and fun, and sea salt balances the sweetness beautifully.
Side Dishes
Serve these treats alongside a rich cup of coffee or hot chocolate to complement the buttery sweetness. They also pair nicely with fresh fruit or a scoop of vanilla ice cream for a delightful dessert spread.
Creative Ways to Present
For parties or gifts, present your Butterfinger Balls in colorful cupcake liners or arrange them on a festive platter with small edible flowers or mini flags. You could also package them in clear boxes tied with a ribbon to wow anyone lucky enough to receive them.
Make Ahead and Storage
Storing Leftovers
If you have leftovers, keep them in an airtight container in the refrigerator. Stored this way, Butterfinger Balls stay fresh and firm for up to one week, so you can enjoy them throughout the week without losing any of their yumminess.
Freezing
To keep them longer, freeze the Butterfinger Balls in a single layer on a parchment-lined tray. Once frozen solid, transfer to a freezer-safe bag or container. They will keep for up to three months, making these little treats perfect for holiday prep or anytime cravings.
Reheating
When ready to enjoy frozen Butterfinger Balls, simply thaw them in the refrigerator overnight. There’s no need to warm them, as they taste best cool with that satisfying crunch intact.
FAQs
Can I use crunchy peanut butter instead of creamy?
You can, but creamy peanut butter creates a smoother mixture that’s easier to shape and melts wonderfully inside the chocolate coating. Using crunchy peanut butter might add extra texture, which some might enjoy, but it may be harder to roll into balls.
What if I can’t find Butterfinger bars?
Butterfinger bars are key for the signature flavor and crunch, but you can experiment with similar crispy peanut butter candies or even crushed peanut brittle for a fun twist on the Butterfinger Balls Recipe.
Is there a way to make these nut-free?
Unfortunately, peanut butter is prominent in this recipe. For a nut-free version, try substituting with a sunflower seed butter and ensure all other ingredients are nut-free. This will change the flavor profile but keeps the idea of candy-coated balls alive.
Can I make smaller or larger balls?
Absolutely! Adjust the size to suit your preference—smaller bites for parties or larger ones for a more indulgent treat. Just keep in mind that chilling time might vary based on size.
How long does it take for the chocolate to set?
At room temperature, it usually takes about 30 minutes to an hour for the chocolate coating to fully harden. You can speed this up by placing the balls in the refrigerator for 15-20 minutes.
Final Thoughts
This Butterfinger Balls Recipe is hands down one of those recipes you’ll find yourself making again and again. It strikes the perfect balance between creamy, crunchy, sweet, and chocolaty, all wrapped up in a fun, bite-sized treat. Trust me, once you try these, they’ll become a staple in your sweet treat repertoire—and a guaranteed crowd-pleaser at any occasion!
Print
Butterfinger Balls Recipe
- Prep Time: 15 minutes
- Cook Time: 2 minutes (chocolate melting time)
- Total Time: 17 minutes plus 30 minutes freezing
- Yield: 16 servings
- Category: Dessert, Candy
- Method: No-Cook
- Cuisine: American
Description
Delightfully decadent Butterfinger Balls combine creamy peanut butter, crunchy Butterfinger candy, and a crumbly graham cracker base, all coated in rich melted chocolate. These no-bake treats are perfect for parties, holidays, or whenever a sweet, crunchy bite is desired.
Ingredients
Base Mixture
- 4 tablespoons softened butter
- 1 cup creamy peanut butter
- 1 cup powdered sugar
- ¾ cup crushed graham crackers
- ½ cup crushed Butterfinger bars
Coating & Garnishes
- 8 ounces chocolate bark or chocolate chips
- Optional garnishes: additional crushed Butterfinger bars, sprinkles, sea salt
Instructions
- Combine Butter and Peanut Butter: In a mixing bowl, combine the softened butter and creamy peanut butter. Blend thoroughly until the mixture reaches a smooth and creamy consistency without lumps.
- Add Vanilla and Powdered Sugar: Mix in the vanilla extract, then gradually add the powdered sugar while continuing to blend. This helps achieve a sweet, smooth, and thick dough-like texture.
- Incorporate Crumbs and Candy: Gently fold in the crushed graham crackers and crushed Butterfinger bars until they are evenly distributed throughout the mixture, adding a delightful crunch to the base.
- Form Balls: Roll the mixture into 1 to 1½ tablespoon-sized balls using your hands or a small cookie scoop. Arrange these on a cookie sheet lined with parchment paper to prevent sticking.
- Freeze for Firmness: Place the tray in the freezer for about 30 minutes, allowing the balls to firm up and hold their shape during the coating process.
- Melt Chocolate: In a microwave-safe bowl, melt the chocolate bark or chips, stirring every 30 seconds to ensure a smooth, even melt without burning the chocolate.
- Coat the Balls: Carefully dip each firm ball into the melted chocolate, making sure it is fully coated. Place the coated balls back onto the parchment-lined cookie sheet for setting.
- Add Garnishes and Set: While the chocolate is still wet, sprinkle additional crushed Butterfinger bars, sprinkles, or a pinch of sea salt on top according to your preference. Allow the chocolate to set completely before serving.
Notes
- Ensure butter is softened to room temperature for easy mixing.
- Crushing the Butterfinger bars finer will create a more even texture in the balls.
- You can substitute chocolate bark with semi-sweet or milk chocolate chips based on your taste.
- Store the finished Butterfinger Balls in an airtight container in the refrigerator for up to one week.
- Freeze leftovers for longer storage and thaw before serving.

