If you are craving a comforting, luscious dish that feels like a warm hug in every bite, then the Creamy Instant Pot Mac and Cheese Bliss Recipe is your new best friend. This rich, cheesy delight combines the convenience of the Instant Pot with a velvety cheese sauce that’s irresistibly smooth and creamy. It’s the perfect weeknight dinner or a crowd-pleasing side that everyone will rave about. Trust me, once you try this recipe, your mac and cheese game will never be the same!
Ingredients You’ll Need
With just a handful of simple, essential ingredients, this recipe balances flavors and textures perfectly to create that ultimate cheesy sensation. Each component plays a key role, from the creamy cheeses to the perfectly cooked pasta, making the dish as flavorful as it is easy to prepare.
- Elbow macaroni: The classic pasta shape that holds onto every bit of cheesy goodness.
- Butter: Adds richness and helps create a silky cheese sauce that coats every noodle.
- All-purpose flour: Used to thicken the sauce, ensuring that perfect creamy consistency.
- Whole milk: The base that makes the cheese sauce smooth and luscious.
- Sharp cheddar cheese: Provides that iconic tangy flavor and vibrant color.
- Mozzarella cheese: Adds a fantastic meltiness for an extra gooey experience.
- Salt and pepper: Simple seasonings that enhance and balance all the rich flavors.
- Garlic powder (optional): Just a touch for a subtle depth of flavor that elevates the dish.
How to Make Creamy Instant Pot Mac and Cheese Bliss Recipe
Step 1: Cook the Pasta Perfectly
Start by pouring the dry elbow macaroni into your Instant Pot along with water and a pinch of salt. Seal the lid and set it to cook on high pressure for just 4 minutes. This quick cook time ensures the pasta finishes al dente, avoiding any sogginess so it can soak up all the cheesy sauce later without turning mushy.
Step 2: Make the Roux Base
Once the pasta is done and the pressure is released, drain any extra water. In the Instant Pot, melt butter over the sauté setting, then whisk in all-purpose flour to create a smooth roux. This base is the secret to the creamy texture of the cheese sauce as it thickens beautifully without any lumps.
Step 3: Craft the Cheese Sauce
Slowly pour in the whole milk while continuously whisking to avoid clumps. Once the mixture is warm and thickened, turn off the heat and stir in the shredded sharp cheddar and mozzarella cheeses until melted completely. The combination of these cheeses delivers that perfect creamy, melty texture you crave from the Creamy Instant Pot Mac and Cheese Bliss Recipe.
Step 4: Combine Pasta and Sauce
Fold the cooked elbow macaroni into the rich cheese sauce, making sure every piece is generously coated. This step is where the magic truly happens—each bite offers a luxurious balance between tender pasta and indulgent, gooey cheese.
Step 5: Final Touches
Season with salt, pepper, and a sprinkle of garlic powder if desired, then give everything one last gentle stir. At this point, you can serve immediately or let it sit for a few minutes to thicken up even further, achieving that iconic, comforting consistency that makes this recipe a true blissful treat.
How to Serve Creamy Instant Pot Mac and Cheese Bliss Recipe
Garnishes
A sprinkle of freshly chopped parsley, a dusting of extra shredded cheese, or even a pinch of smoked paprika make wonderful garnishes. They add an inviting pop of color and a hint of fresh flavor that brighten the dish’s richness perfectly.
Side Dishes
This mac and cheese pairs amazingly well with crisp green salads, roasted vegetables, or even tangy coleslaw. These sides provide a refreshing contrast to the creamy richness, balancing your meal beautifully and adding some delightful variety to every bite.
Creative Ways to Present
For a fun twist, serve the mac and cheese in individual ramekins topped with crunchy breadcrumbs and broil them for a golden crust. Alternatively, layer it in a casserole dish with a crispy pancetta or bacon topping to add texture and a savory depth that your guests will adore.
Make Ahead and Storage
Storing Leftovers
If you have leftovers, store them in an airtight container in the refrigerator for up to 3 days. Because this is a creamy cheese dish, it’s best to cool it completely before refrigerating to maintain the sauce’s luscious consistency when reheated.
Freezing
You can freeze this dish, although the texture might change slightly after thawing. To freeze, spread the mac and cheese in a freezer-safe container and cover tightly. It will keep well for up to 2 months – just thaw overnight in the fridge before reheating gently on the stove or in the microwave.
Reheating
When it’s time to reheat, add a splash of milk or cream to loosen the sauce as it warms up. Gently stir on medium heat until it’s heated through and creamy again, making sure not to overcook or the cheese might become grainy. This way, your Creamy Instant Pot Mac and Cheese Bliss Recipe tastes just as heavenly as when freshly made.
FAQs
Can I use different types of cheese?
Absolutely! Feel free to mix in gouda, fontina, or even pepper jack for a unique flavor profile. Just remember to use cheeses that melt well to keep that creamy consistency.
Is this recipe suitable for a dairy-free diet?
This recipe relies heavily on dairy for its creaminess, but you can experiment with dairy-free cheese alternatives and plant-based milk. Keep in mind the texture and flavor may vary.
Can I make this recipe without an Instant Pot?
Yes, but the Instant Pot speeds up the cooking and ensures perfectly cooked pasta every time. On the stovetop, cook pasta until al dente and make the sauce separately, then combine.
How do I prevent the mac and cheese from becoming gummy?
Cooking pasta for just the right amount of time and thoroughly draining excess water is key. Also, stirring the sauce gently as it thickens helps keep a smooth texture without gumminess.
Can I add protein or vegetables to this recipe?
Definitely! Cooked chicken, crispy bacon, or steamed broccoli are popular add-ins. They add heartiness and variety, making this dish a full meal.
Final Thoughts
The Creamy Instant Pot Mac and Cheese Bliss Recipe has quickly become one of my all-time favorites for a good reason. It’s easy, fast, and results in a rich, comforting dish that feels like a celebration in every spoonful. If you haven’t yet, give it a try—you’ll be delighting your taste buds and making your family’s weeknights infinitely cozier.
Print
Creamy Instant Pot Mac and Cheese Bliss Recipe
- Prep Time: 15 minutes
- Cook Time: 30 minutes
- Total Time: 1 hour 45 minutes
- Yield: 6 servings
- Category: Bread
- Method: Baking
- Cuisine: American
Description
This Creamy Instant Pot Mac and Cheese recipe offers a rich, cheesy delight that’s perfect for a quick and comforting meal. Using an Instant Pot speeds up the cooking process while delivering a perfectly creamy texture. Ideal for busy weeknights or when you need a satisfying dish in under 30 minutes.
Ingredients
Ingredients
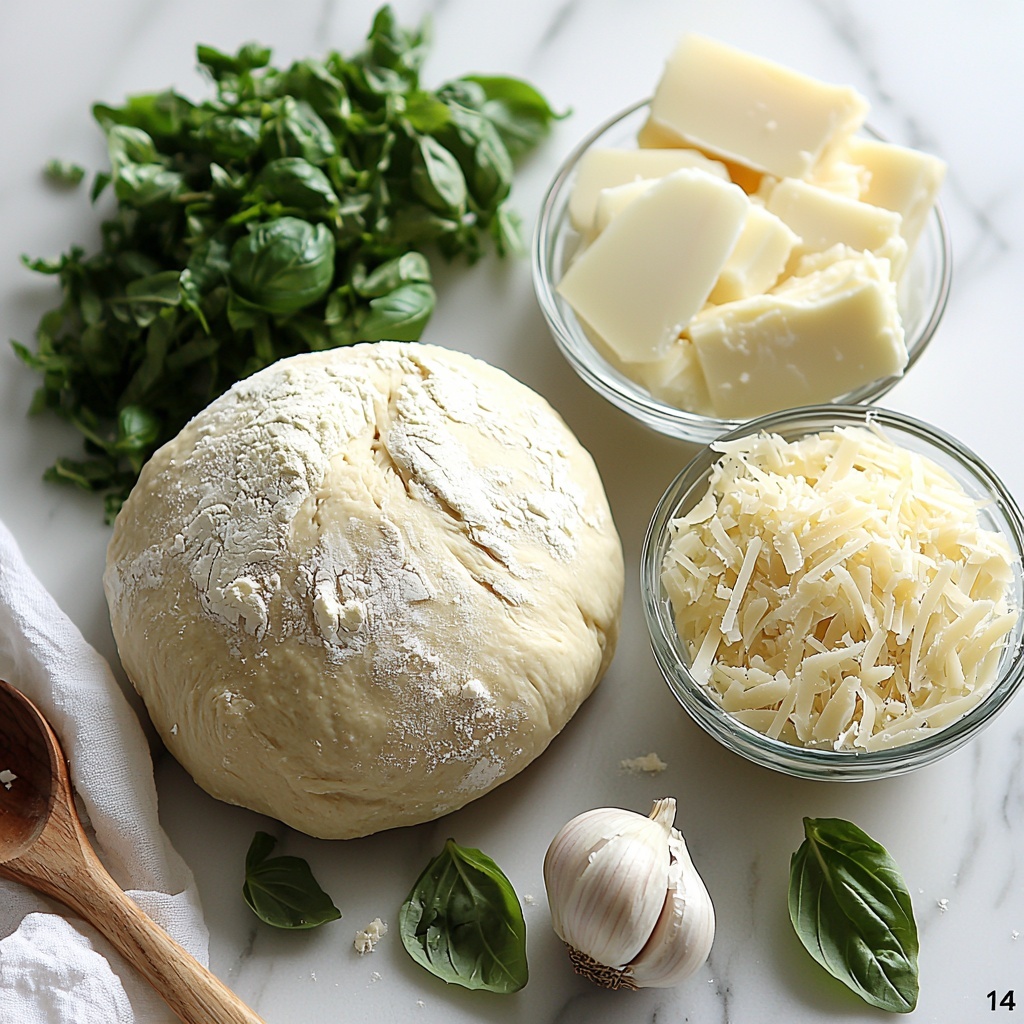
- 1 loaf Bread Dough (homemade or store-bought)
- 3 cloves Minced Garlic
- 1 cup Chopped Fresh Parsley
- 1 cup Chopped Fresh Basil
- 2 cups Shredded Mozzarella Cheese
- 1/2 cup Grated Parmesan Cheese (optional; can substitute sharp cheddar)
- 1/2 cup Melted Butter
Instructions
- Prepare the Dough: Allow the bread dough to rise in a warm area until doubled in size, which usually takes about 1 to 2 hours.
- Roll Out the Dough: Lightly dust your work surface with flour, punch down the risen dough to release air, then roll it into a rectangular shape about 1/4-inch thick.
- Make Garlic Herb Butter: Combine the melted butter with the minced garlic, chopped parsley, and fresh basil, mixing well until fragrant and thoroughly blended.
- Spread Mixture: Evenly spread the garlic herb butter mixture over the rolled-out dough, ensuring the entire surface is coated for full flavor.
- Add Cheese: Sprinkle the shredded mozzarella and grated Parmesan (or cheddar if substituting) evenly over the buttered dough, making sure to cover all areas for melty, cheesy goodness.
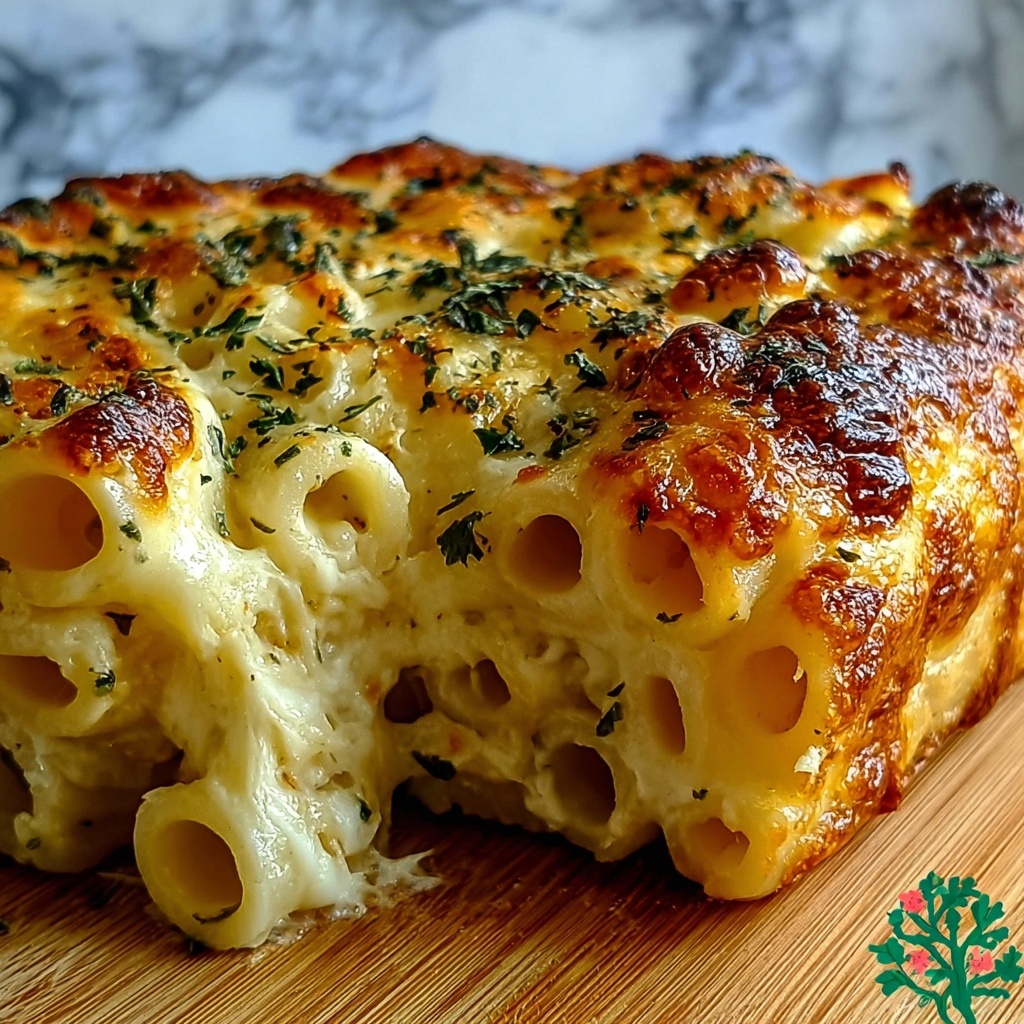
- Roll and Slice: Carefully roll the dough into a log shape, then slice it into 1 to 2-inch thick pieces to create individual swirled sections.
- Arrange in Pan: Grease a baking dish, then place each sliced piece upright, side by side, creating a swirl pattern that will bake beautifully.
- Bake: Preheat your oven to 350°F (175°C) and bake the arranged slices for 25 to 30 minutes, or until they are golden brown on top.
- Serve: Let the baked bread cool for a few minutes to set, then serve warm as a delicious, cheesy side or snack.
Notes
- You can substitute Parmesan with sharp cheddar cheese if you prefer a stronger flavor.
- For a dairy-free option, use a vegan butter substitute and vegan cheeses.
- Make sure the dough is well-risen before rolling for the best texture.
- The herb butter can be customized with other herbs like thyme or rosemary depending on your taste preferences.
- Serve with a fresh salad or soup for a complete meal.


